This article has appeared previously with Equestrian Life. To see what’s in our latest issue, click here.
Exercise 1: Lateral flexion: understanding about bending and softening.
Double Dan Horsemanship is big on body control, understanding the horse and knowing how to get a connection, starting with the feet. So instead of getting caught up in “how does my horse feel and what’s he doing here’’, working on your horse’s feet can help with other training issues.
WORDS AND PHOTOS BY UTE RAABE
US HORSE TRAINER Ray Hunt was famous for saying: “The pathway to the horse’s mind is through his feet”. It’s a philosophy held dear by Dan Steers of Double Dan Horsemanship. As he explains: “I look at it as a student-teacher relationship; I’m the teacher, the horse is the student. I have to be able to help him. Superior athletes know their body really well, they know their job and anyone could train them, whether it is a dressage horse, a racehorse or a cow horse. But that’s only one per cent or less, then there are other horses who might be athletic but need a little bit of support. Knowing our horse and knowing where their feet are might be the difference in improving that movement or jump that little bit higher. I try to make it simple and start as early as possible with the basics so you develop together and get that harmony with your horse”.
“Everything the horse knows right, we taught him. Everything the horse knows wrong, we taught him. How the horse actually learns is through pressure and release. But it is not the pressure that causes the horse to learn, it is the release of pressure. I always thought that pressure was something abrupt, a real physical pressure, but it is much simpler. For example, when you take contact through the reins, that is pressure. With a sensitive horse your approach onto the yard is pressure. You can teach a horse many things without ever touching him and we can unintentionally teach our horse the wrong thing by releasing the pressure at the wrong time. The learning process is like a journey; anytime I get closer to my destination I have to reward my horse and release the pressure. It is about the journey just as much as it is about the destination. I want my horse to do things to the best of his ability.”
Equestrian Life visited one of Dan’s clinics in Victoria. Here are some of the ground exercises he presented and carefully demonstrated to the class.
What you need:
- Halter and lead rope
- Bridle
- Dressage whip
- Patience and persistence
Exercise 1: Lateral Flexion (image above)
This is a great base point because it teaches the horse how to yield to the pressure of the halter. Lateral flexion involves all four feet to stand still and bending the horse’s head and neck around to his body. From there you start to look at how well he can do it, how deep the flexion starts to get. How many wrinkles along the baseline of his neck can we develop? At the start there may be just a few wrinkles down on the shoulder, then perhaps some just under the throat latch – try getting those to join up until there are so many wrinkles that you can’t count them.
Dan highlights how important it is where you stand. Standing forward off the girth would interfere with the horse. Standing behind the girth allows you to bend him all the way to his body. You also want to be hugging him as close as possible, so you are not confusing him with leading and asking him to follow you. Then take contact relatively close to where the lead rope connects to the halter and just start to bend him towards his whither. If the horse is a little stiff in the halter, tickle him a bit with your thumb forward off the girth to give him something to bend around to, almost as if he might be thinking about biting a fly.
This is about increasing the pressure, but it is vital to be really careful about when to release. If the horse starts moving and you stop then, you would have just told him through that release of pressure that he should keep moving. As Dan points out, “Be persistent and just hold, hold, hold – until the horse stops. Then ask him to flex around the girth again, and if he gives to the lead rope, soften back. That’s how he knows he’s on the right track. You want him to understand about bending but also about how to soften to the rope. Every time he gives, give back.”
He explains his approach, “When I am training my horses, there are three things on my mind: I want my horse to be soft, willing and patient. Soft means: Can you be as light as you can be? Patience is: Are you happy to hold it? Willingness is a ‘Yes, Sir’ attitude. As your horse improves, change sides. You’ll find that he has a preferred side. To improve and develop your horse, for every one flexion to the preferred side, you do two to the non-preferred side.”
Exercise 2: Hindquarter Yield
The hindquarters are the horse’s engine. This exercise is isolating the horse’s backend from its front end and basically disengaging his engine. The further you can separate the backend from the front the less power a horse will have. Collection is the opposite, it empowers a horse.
Dan demonstrates the exercise first, “Draw a little circle around the front feet, that’s the zone where you like to keep them. The back feet are travelling on a larger circle surrounding the small circle. Your zone is in between. The front feet are controlled by the halter and lead, and pointed towards you. The whip is controlling the hind feet and does the pushing. Take the lead rope and press it back towards his shoulder, pick up the whip and stimulate the horse on his hindquarters until he takes a step away from that whip. Look for the inside hind foot stepping over the outside hind foot. Once the horse is activated, the whip just sits in position. If you are happy and want the horse to stop, lower the whip. If he doesn’t stop, give him a few short tugs, saying, ‘hey, the whip said stop, so you should stop.”
Only stimulate your horse with the whip when he is not moving. With a lazy horse people often tend to over-stimulate. But if he is moving, why continue? Only if he stops without you asking, then you may stimulate again. Make sure there is a clear cut, the aid is just the physical pressure of the whip. The aim is that your horse doesn’t need the stimulation at all, but it is very important that he understands the consistency: active when the whip is off the ground or inactive when the whip hits the ground – on and off. The stop is as important as the go.
“I don’t want to use my body language to move the hindquarters around as I want to be able to translate my ground exercise to ridden exercises. Under saddle I can only use direct aids, rein or leg aids for instance, but no body language. So I am simulating my ridden aids here on the ground. As a little test and to see how you are going, you can alternate from right to left, and see how seamless you can get the change. You want to see those hips roll from right to left to right with no hesitation, like you are doing a line dance.” Dan instructs.
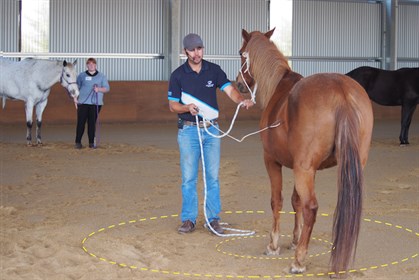
Exercise 2: See the two circles in the sand?
Exercise 3: Add the Bridle
To associate the groundwork with the ridden aids, the students bridle their horses. Dan shows them how to repeat the lateral flexion exercise with the reins in the same position as with the halter, nice and low, but tipping the reins up to where the back of the saddle would be. It is not the contact that is important, it is the angle. The rein aids are all behind the bridle, just like during riding. Taking the rein to the back of the imaginary saddle is like taking the reins to your hip. As training is refined, the aids become more refined from wide open hands on a young horse to just rolling your wrists on an experienced horse.

Exercise 3: Tip your rein up to where the back of your saddle would be.
Exercise 4: The Perfect Circle
At an advanced stage this exercise can be done at walk, trot and even at the canter, in the halter, the long rein and at liberty – yet the principle of the circle is the same, the horse should hold the same shape. The distance and radius between your feet and the horse’s inside front foot need to stay the same the whole way round the circle. Establishing the bend in the circle improves the actual flexion in the horse, you want him to bend from his nose to his tail. Impulsion will create lightness and help you influence the horse’s feet. But as Dan points out, “Impulsion does not mean going faster, instead we are looking for energy and elevation. Think of it as heating water on the stove: impulsion is like simmering but not yet boiling.”
“If the radius becomes too small, pick your inside rein up high and apply pressure on the girth area of your horse. The biggest no-no is leading your reins forward, as this will straighten your horse. Use your whip to encourage the hind feet to get more active and create enough energy for the horse to step away from you. If your horse goes wider than you would like him to, then pull the inside front foot towards you. The smaller the circle, the greater the bend I want to the inside. To achieve the right bend I need to drive the horse with his inside hind foot. He needs to step up and over and slightly across to have his ribcage bending to the same direction as the inside front foot.”
By observing the horse’s hoof prints in the sand the students can check if they are on track. Instead of the inside front foot and inside hind foot landing roughly in the same place, they should be about a foot apart. Dan adds a tip, “When that hind foot comes off the ground, roll your wrists to the back of the invisible saddle to push the hind foot to the outside. The further you push, the greater the bend.”

Exercise 4: You want your horse to bend from nose to tail.
Exercise 5: Shoulder-Yield
Dan demonstrates how to add a shoulder-yield to the exercise. To do that he takes the reins up halfway between the horse’s ears and wither, along the mane, and walks towards it. But when you move the shoulder out of the circle, it is not the pushing on the neck the horse responds to, the indirect rein aid is what causes the inside front foot to step over the outside front foot. Dan clarifies the exercise, “Influence the foot when it is on the way up, not the way down. The quality of your circle will determine how easily you can ask for that shoulder-yield. You are only looking for one or two nice, soft strides to the outside and then go back to the circle. If you take the rein further back, the front feet will stop and the hind feet will work. If you find that the hindquarters are going out and the shoulders are not moving, look at what you are doing with the rein. It is not the horse doing the wrong thing, often it’s the way you are asking him.”

Exercise 5: Take the reins up halfway between his ears and wither, and walk towards it.
Exercise 6: The Seamless Combination
To finish Dan shows how to put it all together in a seamless transition, “Start on your walk circle, then take your rein forward and push the shoulder out for a shoulder-yield. Take your rein to the back of the saddle and follow up with your hindquarter-yield, then let them stop, straighten, walk in, pat the neck and do your lateral flexion. This needs to be as smooth as possible and that only comes with continuous practise. The more you do, the more relaxed the horse will become.”
Often riders are too quick to keep going and look at what’s next, but when it comes to training a horse, what’s next is just the same exercise but doing it better. To say it with Dan’s words, “Sometimes it can take us months to develop an exercise; it is not about how quickly, but how well I can get it done.”

At the end of a performance or long training day, Dan Steers rewards his horse with an Equissage rub down.
DAN’S HANDY TIPS – BRIDLING
“If you have difficulties bridling your horse, taking him into a stable or some other confined space helps. Apply a little bit of pressure by pulling on the halter to help him lower his head. If he softens, respond with release. Once he understands how to lower his head from that poll pressure, I first check if I can rub his ears and then if I can open his mouth with the corner of my thumb. Just like with everything else, I am waiting for that release and for him to soften before I try to do both at the same time. Then bring the bridle up over the horse’s poll with your right hand, and then with your left hand open up his mouth and bring the bit in. To put the bridle on, slip it over the nearside ear, then offside ear.”
“When it comes off, this is all done in reverse, and it is even more important how you get the bridle off because that is the last thing the horse is going to remember about the bridle. I take a little bit of contact with the cheek piece, pull it over the offside ear, nearside ear, then hold the bridle in place – I don’t want the bit to hit the horse’s teeth – so I wait for the horse to let go of the bit and drop it.” Voila!
READ THE LATEST NEWS ARTICLES HERE